

Documentation Index
Fetch the complete documentation index at: https://cantonfoundation-add-app-development-module-579.mintlify.app/llms.txt
Use this file to discover all available pages before exploring further.
Reward Minting and Traffic Funding
As explained in tokenomics-and-rewards, your validator node will need traffic to submit the transactions to execute withdrawals or accept multi-step deposits. As also explained in that section, the network provides rewards that can be used to fund traffic. Note also that every validator node has an associated validator operator party that represents that validator node’s administrator (docs). The validator node automatically mints rewards for that party. It can further be configured to automatically purchase traffic using that party’s CC balance, which includes the minted rewards. We thus recommend the following setup as a starting point to mint rewards and automatically fund traffic:- Use the validator operator party as your featured
exchangeParty. Follow exchange-party-setup to get it featured. - treasury-party-setup to create a
treasuryPartywith a transfer preapproval managed by yourexchangeParty. - Setup automatic traffic purchases in the validator app.
- Optional: setup auto-sweep from the
exchangPartyto yourtreasuryPartyto limit the funds managed directly by the validator node.
targetThroughput to 2kB/s
and minTopupInterval to 1 minute, which should be sufficient to execute about one withdrawal or deposit acceptance every 10 seconds.
Please test this with your expected traffic pattern and adjust as needed.
See this FAQ to measure the traffic spent on an individual transaction.
Setup Exchange Parties
Setup the featured exchange party
As explained above in reward-minting-and-traffic-funding, we recommend to use the validator operator party as your featuredexchangeParty. This party is automatically created when you
deploy your validator node.
Thus the only setup step is to get it featured by the SVs:
On DevNet, you can self-feature your validator operator party as follows:
-
Log into the wallet UI for the validator user, which presents itself as in this screenshot:
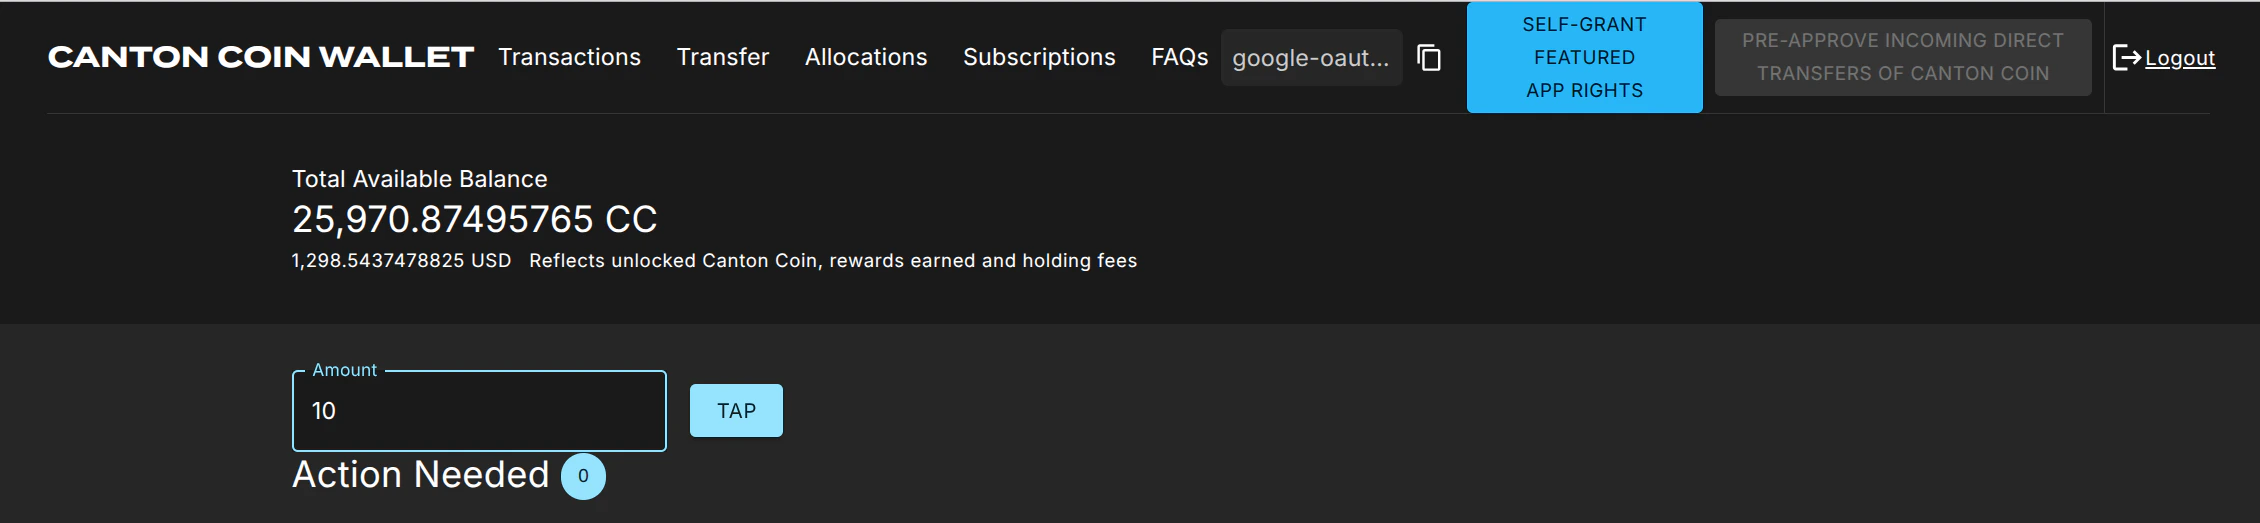
- Tap 20 $ of CC to ensure that your validator operator party has enough funds to purchase traffic.
- Click on the “Self-grant featured app rights” button.
-
The button is replaced with a star ⭐ icon once the
FeaturedAppRightcontract has been created for your validator operator party. This may take about 10 seconds.
- Log into the wallet UI for the validator user on your MainNet validator node.
- Copy the party-id of your validator operator party using the copy button right of the abbreviated
"google-oaut.."party name in the screenshot above. - Apply for featured application status using this link: https://sync.global/featured-app-request/
FeaturedAppRight contract issued by the DSO party for its validator operator party.
On TestNet there is currently no official process, but you should be able to use the same procedure as the one for MainNet.
Setup the treasury party
Setup thetreasuryParty as follows with a transfer preapproval managed by your exchangeParty:
-
Create the
treasuryPartyusing the wallet SDK to create-an-external-party with a key managed in a system of your choice -
Copy the party id of your
exchangePartyfrom the Splice Wallet UI as explained above, or retrieve it by calling/v0/validator-useron the Validator API. -
Call
/v2/commands/submit-and-waiton the Ledger API to create a#splice-wallet:Splice.Wallet.TransferPreapproval:TransferPreapprovalProposal(code) directly with theproviderset to yourexchangeParty. Note that setting up this transfer preapproval requires theexchangePartyto pay a small fee of about 0.25 $ worth of CC. The funds for this fee usually come from the validator liveness rewards that a validator node starts minting about 30 minutes after it is created. On DevNet or LocalNet, you don’t have to wait that long: just “Tap” the required funds from the built-in faucet.
Testing the party setup
You can test the party setup on LocalNet or DevNet as follows:- Setup your
exchangePartyandtreasuryPartyas explained above. - Setup an additional
testPartyrepresenting a customer. - Transfer some CC from the
testPartyto thetreasuryPartyto simulate a deposit. - Observe the successful deposit by listing holdings of the
treasuryParty. - Observe about 30’ later in the Splice Wallet UI of your validator operator user that the
exchangePartyminted app rewards for this deposit. It takes 30’, as activity recording and rewards minting happen in different phases of a minting round.
Setup Ledger API Users
Clients need to authenticate as a Ledger API user to access the Ledger API of your Exchange Validator Node. You can manage Ledger API users and their rights using the/v2/users/... endpoints of the Ledger API.
You will need to authenticate as an existing user that has participant_admin rights
to create additional users and grant rights.
One option is to authenticate as the ledger-api-user that you
configured when setting up authentication for your validator node.
Another option is to
log-in to your Splice Wallet UI for the validator operatory party
and use the JWT token used by the UI.
We recommend that you setup one user per service that needs to access the Ledger API.
This way you can easily manage permissions and access rights for each service independently.
The rights
required by the integration components are as follows:
| Component | Required Rights | Purpose |
|---|---|---|
| Tx History Ingestion | canReadAs(treasuryParty) | Read transactions and contracts for the treasuryParty. |
| Withdrawal Automation | canActAs(treasuryParty) | Prepare and execute transactions on behalf of the treasuryParty. |
| Multi-Step Deposit Automation | canActAs(treasuryParty) | Prepare and execute transactions on behalf of the treasuryParty. |
| Automated exchange parties setup for exchange-integration-testing | participant_admin and canActAs(treasuryParty) | Create parties and use the treasuryParty to create its TransferPreapprovalProposal. Hint: grant canActAs(treasuryParty) to the user doing the setup after allocating the treasuryParty. |
.dar File Management
.dar files define the Daml workflows used by the token admins for their tokens.
They must be uploaded to your Exchange Validator Node to be able to process
withdrawals and deposits for those tokens.
The .dar files for Canton Coin are managed by the Validator Node itself.
The .dar files for other tokens need to be uploaded by you using the /v2/packages endpoint of the
Ledger API.
See this how-to guide
for more information.
Monitoring
See the Splice documentation for guidance on how to monitor your validator node. It also links to many other metrics that can help monitor traffic usage and balances of local parties, such as theexchangeParty.
Logical Synchronizer Upgrades
For protocol changes and network-wide disaster recovery, the Global Synchronizer uses Logical Synchronizer Upgrades. The schedule for these upgrades is published by the Super Validators and also announced in the#validator-operations Slack channel.
Logical synchronizer upgrades do not use the deleted major-upgrade runbook. Integration operators should follow the current validator-operator communications for each LSU and verify whether their ingestion components need a pause, replay, or catch-up procedure for that specific upgrade.